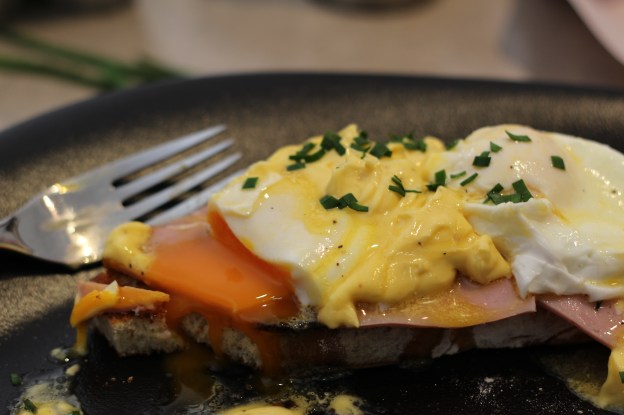
As part of my Master of Gastronomic Tourism food technology unit, I have been asked to make eggs benedict. Easy, right? Except I have to make everything – the sourdough (culture and bread), the butter, hollandaise and the poached eggs. None of which I have made before. On the upside, I don’t have to go salmon fishing or pig farming.
Actually, I’m really excited about this, and so are my friends. They know how much I love to cook and have all jolly decently offered to help me test my efforts. I’m looking forward to learning some the technology behind these foods – the chemical, physical and functional basis of the ingredients. So I’m going to take you on the journey with me, as I cook with and learn about carbohydrates, proteins and lipids and some of the processes that turn them into delightfully delicious foods.
Appropriately, we’ll start with the starter. Sourdough is my favourite type of bread, but I also know it’s incredibly hard to make, so the first thing I do is read the recipe – three times. Then I consult the experts, looking for advice on what and what not to do. A lot of it is pretty scientific and it soon becomes clear that this is a highly temperamental bread, so with a healthy dose of trepidation and a tub of yoghurt I get started.
Sourdough
Day 1
I mix 75 ml full fat plain yoghurt with 175 ml warmed skimmed milk. Looks pretty boring to me, but my research assures me that pretty soon the bacteria in the yoghurt will set to work digesting the lactose sugar in the milk, converting it into lactic acid which will sour and thicken it. In other words, the process of fermentation will begin [1].


Day 2
I add 120 grams of strong (bread) flour. This flour is high in protein, which is good for the development of gluten and a well-risen loaf [2]. I cover the starter loosely and leave it at room temperature for two days.
Day 4
My starter is bubbling nicely and smells a bit sour. Lovely. This tells me the bacteria, in consuming the sugars for energy, is producing alcohol and carbon dioxide – the gas bubbles we need to help leaven the dough [3]. I add 180 grams more of the same flour, as well as 100 ml warmed water and 40 ml milk.


Day 5
By now the wheat starch is likely being degraded to monosaccharides and disaccharides, with proteolysis (amino acid production) adding to the formation of my bread’s flavour [4]. I discard half of the starter and add another 150 grams of flour and 150 ml of warm water and mix thoroughly.
Day 6
Baking day. I warm 225 ml water to 49°C, remove 4 tablespoons to a glass and sprinkle over 15 grams of dry yeast. After about 5 minutes it begins to foam. Meanwhile, in a separate bowl I mix the balance of the water with 250 grams of the sourdough starter and add a cup of flour. I stir until it is combined, then add the foamy yeast and mix for another 5 minutes. As the dough starts to come together I imagine the substances produced by the yeast and the oxygen are working together to form long glutenin chains and an interconnected network of coiled proteins, or what we call gluten [2]. My research also tells me that the production of metabolites by the yeast I have added is going to add more aroma compounds that the sourdough would have had if I had used just the starter [5].

I add the balance of 450 grams of flour and one tablespoon of salt and knead the dough for a solid 10 minutes. Doing this helps stretch and organise the glutenin proteins into an elastic network, while at the same time working the gliadin proteins to develop the dough’s plasticity [2]. The addition of salt will help to tighten the protein bonds and develop better dough elasticity and strength [3].


The dough is left in a greased bowl covered with a damp cloth, in a room I have heated to 30 degrees Celsius for about an hour or until doubled. Doing so encourages the process called autolysis (the Greek term for “self-digestion”), which basically means the dough is doing a lot of the hard work, forming a solid gluten structure and creating a stretchy dough with large air pockets retaining the aromatic gases produced during fermentation [3].

I punch down the dough and shape it into a round loaf, place it on a baking tray dusted with cornflour, cover it with a damp cloth and return it my 30-degree heated room.
It rises fairly quickly to double its initial size again. I brush the top of the dough with beaten egg white and score a basic square, trying to keep it at an angle to form a protective lip which should allow the cut to retain moisture and crack smoothly.

The dough goes onto the middle rack of the oven at 230°C, over a pan of boiled water, for 10 minutes. The water will create steam in the oven, keeping the crust soft and allowing the bread to maximise its rise from the rapidly expanding gases (a process called “ovenspring”) [6].
I remove the water and reduce the temperature to 190°C, baking the bread for about 40 minutes until it is well browned. So what happens while I’m holding my breath and willing my bread to rise perfectly? The gluten’s protein molecules start bonding together, squeezing out water and forming a network around the starch granules and water bubbles [7]. Simultaneously, the starch granules start separating from each other and thickening as they absorb the water discharged by the gluten [7]. In other words, the starch gelatinises, forming a moist crumb [8]. Meanwhile the dry heat in the oven is breaking down the starches on the outside of the bread and turning them into disaccharides (dextrins), which are brown and have a very distinctive taste [9].
At last it’s time to remove my loaf from the oven and bask in the heady aroma of freshly baked bread. My sanctimonious glee is only slightly marred by the fact that my bread is not quite as leavened as I would have liked. In fact, when I’ve allowed it to cool a little and slice it, I realise it’s quite dense. Only marginally deterred (it is my first effort after all), I butter a crusty slice and enjoy its pleasantly sour chewiness while I contemplate where I went wrong.


Perhaps I should have leavened the dough at a lower temperature, given that temperatures of 30-35 degrees Celsius promote the development of bacteria, while temperatures of 20-25 degree Celsius are more conducive to yeast growth in acid environments [2].
Maybe I should have scored the top more, which would have given the dough more weak points, allowing the surface to burst and the bread to expand [3]. Maybe I over-fermented the dough, allowing the breakdown of the gluten bonds [3], or maybe I didn’t aerate the starter enough, limiting the oxygen the yeast needs to grow [2].
I decide to accept it as a learning experience, promising myself I’ll try it again, perhaps with a rye wholegrain starter, a combination of flours and a little more time.
Butter
Knowing that butter is often simply the result of over-whipping cream, I am far less apprehensive about making it. Using 39.4% fat pure cream, I use an electric beater to agitate it until the fat globules become so damaged that their fat starts leaking out [2]. I continue churning until the buttermilk starts forming a mass separate from the fat grains. This takes a little over 10 minutes. I place the grains in a piece of muslin suspended over a bowl and squeeze out the excess buttermilk, then push the butter into containers and drain off the buttermilk that rises to the surface. Done.


Hollandaise Sauce
Julia Childs says of hollandaise that whichever way you make it, the desired result is the same, “that of forcing egg yolks to absorb butter and hold it in a creamy suspension” [10]. All the recipes I have found incorporate egg yolks, water and butter and call for the addition of vinegar or lemon. The other primary ingredients include a low and gradual heat, constant attention and patience.
My recipe starts with boiling 1 tablespoon of vinegar with ¼ teaspoon of crushed peppercorns, until only a third of the liquid remains. I add a tablespoon of cold water to this and allow it to cool.
Next I add 2 egg yolks and 2 teaspoons of cold water and whisk the ingredients together. I put the pan over another pan of gently simmering water and continue whisking until the yolks foam and thicken to the point that the trail of the whisk leaves a mark and I begin to see the bottom of the pan. To achieve this “sabayon” stage the egg yolks have to undergo denaturation, a process essential to forming the gel that will retain the foam and air bubbles [11]. I mentioned low and gradual heat before. This is critical as overheating the sauce could denature the proteins too much and result in a curdled or runny sauce [12]. Once I have achieved my gel, I remove it from the heat and allow it to cool slightly.


The next stage of the sauce is the emulsification (although the yolks have already been somewhat emulsified with the water). Egg yolks are rich in phospholipids which act as emulsifying agents and will keep the water and oil separated in the sauce [11]. To ensure the butter I add is not below the temperature at which butter crystalises (38°C) and to make sure its molecules are small enough to be emulsified, I melt my butter before adding it very gradually while whisking [11]. Once all the butter has been incorporated and my sauce is silky smooth, I add cayenne pepper and salt to taste and keep the sauce warm over a pan of lukewarm water, while I set to making my poached eggs and grilling my sourdough.

Poached Eggs
Strange to think I’ve come this far and this is one of the elements of this dish that intimidates me the most. Perhaps it’s because I know how critical it is to have fresh eggs and I have no idea how long the eggs I’ve bought have been in transit or sitting on the shelf at the store. A little research tells me that I can test this by plunging the eggs into salted water (125 grams salt per litre of water). If they sink, the egg is less than 3 days old; if it floats about midway in the pan, its likely 3 to 6 days old, but if it floats on the surface, it’s too old to use [13].
Another reason for my trepidation is the knowledge that the egg white – the albumen – has a thin outer layer that has a tendency to spread out before it solidifies [2]. I’ve tried the vortex method before and like Felicity Cloake, can attest that while I may understand the logic of this, my eggs do not [14].
Well prepared to use all the help I can get, I add a dash of vinegar to a deep saucepan of boiled water. The vinegar helps coagulate the egg proteins quicker, but has the added benefit of preventing the proteins from getting too close and so makes the texture of the cooked egg more tender [2]. My next trick is to crack the eggs into two small but open-lipped bowls, stir the water to create the afore-mentioned vortex and drop the in while uttering sweet nothings. I’ve reduced the temperature of the water to a gentle simmer, hoping that this will save my eggs from too much turbulence and after 3 minutes, I cradle them out of the pan with a slotted spoon. They’re perfect – albeit for a few tatty strands which I gently snip away before plating.

Eggs benedict is my favourite dawn breaker, and always will be, but I’ll never take a perfectly served rendition of it for granted again.
References
[1] BBC, 2014, Using bacteria to make cheese and yoghurt, viewed 20 May 2017, <http://www.bbc.co.uk/bitesize/standard/biology/biotechnology/living_factories/revision/6/>.
[2] McGee, H 2004, On Food & Cooking: an encyclopedia of kitchen science, history and culture, Hodder & Stoughton, Great Britain.
[3] Lugg, CA & Fjeld, MIH 2017, Sourdough, Hardie Grant Books, London.
[4] Kati, K, Kaisa, P & Karin, A 2004, ‘Influence and Interactions of Processing Conditions and Starter Culture on Formation of Acids, Volatile Compounds, and Amino Acids in Wheat Sourdoughs’, Cereal Chemistry, vol. 81, no. 5, pp. 598-610.
[5] Corsetti, A & Settanni, L 2006, ‘Lactobaccilli in sourdough fermentation’, Food Research International, vol. 40, no. 5, pp. 539-558.
[6] Christensen, E 2009, Food Science Tip: Add Steam When Baking Bread, Kitchn, viewed 20 May 2017, <http://www.thekitchn.com/food-science-tip-add-steam-whe-76586>.
[7] Ulin, D 2010, What happens to bread in the oven? Indiana Public Media, viewed 20 May 2017, <http://indianapublicmedia.org/amomentofscience/bread-oven/>.
[8] Peter Reinhart: The art of baking bread, TED Talks, viewed 10 May 2017, < https://www.youtube.com/watch?v=gK8Yk3mEEb8>.
[9] Love Food Love Science (n.d.), Carbohydrates: Dextrinization, viewed 20 May 2017, < http://www.ifst.org/lovefoodlovescience/resources/carbohydrates-dextrinization>.
[10] Childs, J, Bertholle, L & Beck, S 2013, Mastering the Art of French Cooking, 25th edn, Alfred A Knopf, New York.
[11] Hopia, A, Sillanpaa & M, Tuomisto, M 2013, ‘Hollandaise sauce and the chemistry behind old and new preparation techniques’, Lumat, vol. 1, no. 2, pp. 189-196.
[12] Fulton, M 2009, Margaret Fulton’s Encyclopedia of food and cookery, 3rd edn, Grant Hardie Books, Australia.
[13] Larousse Gastronomique 2009, Hamlyn, London.
[14] Cloake, F 2010, How to make the perfect poached egg, The Guardian Word of Mouth Blog, viewed 2 May 2017, <https://www.theguardian.com/lifeandstyle/wordofmouth/2010/sep/16/how-make-perfect-poached-egg>.

Glad you are back – missed your postings recently. What a lot of work but well worth it, I’m sure.