Not Water for Chocolate

Fondant 3 Plated

For this entry I have been asked to create a chocolate dessert, pair it with a wine and conduct a sensory analysis of the pairing. For this I have chosen my favourite dessert, chocolate fondant and paired it with a red wine. I have twisted it with dark chocolate because I’m not mad about sweet desserts and feel the same about sweet wines. I also wanted something a little more bitter and with less fat to compliment the wine I have chosen; adding raspberries and blueberries to balance the richness of the dessert and bring it together with the fruit profile of the Zinfandel I have settled on. I have invited some friends over to help me out with an evaluation of the pairing. My objective is to conduct an analysis of their sensory response which I will chart to draw the parallels and/or divergences.

First I should tell you that I have given a great deal of thought to both the physical and chemical aspects of all the ingredients, particularly as I am pushing the boat out and taking the hotly contested path of serving a chocolate dessert with a red (not sweet or fortified) wine.

Risky as it is, I’m hoping that by the time you’ve finished reading this you’ll have faith and give it a go yourself. I’m also hoping my friends will still be my friends, my fondants look like fondants and not what they tend to look like when they go wrong, and that my investment of time and money pays off.Wine

Wine and chocolate are not as different as you may think. Their histories are centuries old, they have both been considered toxic and sinful aphrodisiacs, and both have evolved to become one of the great pleasures of life and even more recently espoused for their antioxidant virtues.

Chemically, both chocolate and wine are produced from fermented fruit using the same type of yeast and both contain tannins [1]. They are also both products of terroir and share many aromas and compounds. This is the first basis of my pairing, for the red wine I have picked is a Murphy-Goode Liar’s Dice Zinfandel (2013), which boasts rich flavours of blackberry jam and raspberry, soft tannins and a “fruit-sweet finish”. It comes from Sonoma County in California, a region renowned for this variety [2].

I have also called on the advice of a few chefs and sommeliers. Tonia Wilson advocates pairing like-for-like, full-bodied wine with strong chocolate and talks of savouring a “sinfully bittersweet chocolate with a Zinfandel” [3]. A few other pathfinders agree [4].

You should know that I’m not going for refreshment. The wine I’m serving is not intended as a “supporting actor”, a “pleasant but contrasting refreshing beverage” to enjoy with the dessert [5]. I am also not looking for boring neutrality – much as you would expect from a pinot noir at a buffet. Albeit my favourite wine varietal, it is not known as the tart of all wines, happy to pair with anything, for nothing [6]. Nope, if I’m going out on the ledge I’m going to do it properly and have a go at full-blown synergy, hoping the gastronomic experience of the pairing will be superior to the sum of its parts [5]. This is, after all, the holy grail of sommeliers and an experience I have only had a few times in my life. Not surprising, given food and wine pairing is considered an art, a science and is at the same time highly subjective. Never mind that what we taste in a wine, in food and ultimately in their pairings, are products of nature, human intervention and perception.

There are many schools of thought on food and wine pairing. Some advocate consideration for the physical aspects of food and wine including colour, shape, size, texture; chemical aspects including nutrients such as carbohydrates, fats, proteins, water, vitamins and minerals; and sensory aspects such as colour, shape, smell, taste, and mouth-feel or texture [7].

IMG_6571Others claim that the sensory aspects of food and wine should be evaluated in terms of sight, smell, touch, taste and even hearing [8] [9]. Tasting and descriptive methodologies are just as diverse, including such tools as aroma wheels, “vinometers” and the systematic approaches of England and Sweden [10].

It is clear that there is no silver bullet for food and wine pairing and the best I can do is find a method I most agree with. Wanting as scientific a base for achieving synergy as I can find, I settle on Harrington’s hierarchical perspective which comprises three elements [5].

The first element considers the the sensory perception of the tongue including sweetness, saltiness, bitterness and acidity. The correlating wine terms would include dryness, level of effervescence and acidity [5].

The second element considered is texture, generally referred to as the body, structure or weight of a wine from light, thin, medium-bodied to full bodied or heavy [5].  The same could be applied to food and in traditional wine and food pairings already has, hence red meat with red wines and white wines with poultry or seafood [11]. In wines texture or body is referred to in terms of tannin, alcohol level and oak. Food characteristics can be described in terms of fattiness, the cooking method applied and/or the overall body [5].

The final element is flavour, but flavour as it relates to our perception of specific characters inherent in the food and wine, which come from sensations of both aroma and taste [5]. Some of the most common flavour characteristics are nutty, fruity, spicy, smoky and meaty [5].  Consideration is also given to the intensity and persistence of the flavours [5].

For my pairing analysis, I use the attributes of the elements I consider most common to the wine and the dessert as the primary characteristics on a star diagram. I provide each of my friends with two charts, one for the wine and one for the dessert. I ask them to rate from 1 to 5 on the chart the degree of each attribute they believe applies to each, using descriptive category scaling; 1 being the least; 5 being the most.

For the dessert I use the characteristics of sweet, bitter, tart, rich, fruity and persistence. For the wine I use the characteristics of sweet, bitter, acidic, weight/body, fruity and persistence.

Wine Pairing 1

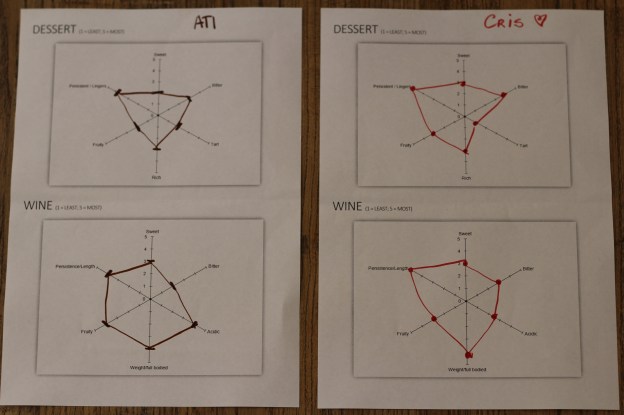
The chart below shows the average of all the rankings for each attribute for the wine and the dessert, the wine depicted by the red line, the dessert with the brown line.

Wine Pairing 2

I could not have been happier with the outcome. Everyone commented on how long the dessert lingered in the mouth. They were quite surprised by how the wine morphed into and elevated the lingering remnants of the chocolate in the mouth. The smooth and silky texture of the fondats balanced beautifully with the wine and the raspberries harmonised with the aroma and tartness of the Zinfandel. I am delighted with the results and the only thing left to do is share the joy.

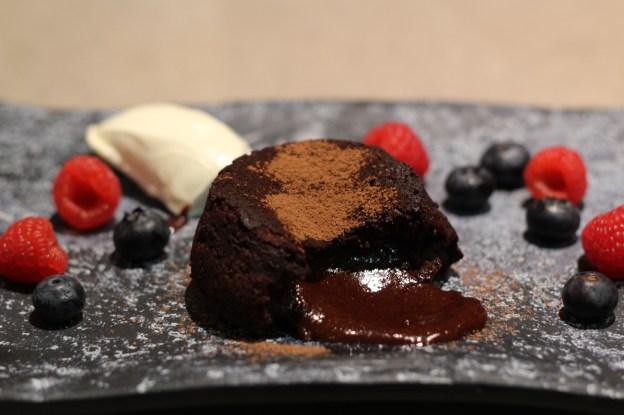
Dark Chocolate Fondant with Raspberries and Blueberries

Serves 6

Ingredients

6 x 150ml pudding moulds or darioles

Fondant 1180g unsalted butter

180g Valronha 66% chocolate

3 whole eggs + 3 egg yolks

1 ½ tablespoons cocoa powder

120g caster sugar

3 tablespoons flour

Grease the darioles well with butter. Place the moulds in the fridge and grease again about ten minutes later. Dust each mould with cocoa powder and return to the fridge.

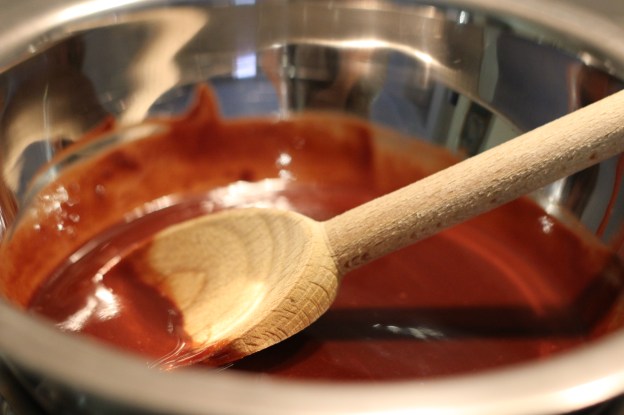
Chocolate does not conduct heat very well, so break into pieces and melt it with the butter in a bowl placed over a very gently simmering pan of water [12]. Make sure the water doesn’t touch the bowl and be extra careful not to get any water in the chocolate. This is because chocolate is extremely dry with millions of particles of sugar and cocoa prone to sticking together and separating from the cocoa butter if a small amount of water is added [12]. Stir the mixture occasionally until properly melted and mixed and set aside to cool slightly.

Fondant 2

Whisk the eggs lightly, then add the sifted sugar, flour and cocoa powder. Be careful not to use Dutch (alkalised) cocoa powder, as natural cocoa powder has roasty, caramel-like molecules and astringent phenolics that add to the flavour [12].

Gently fold in the melted butter and chocolate and mix until well combined. Spoon the mixture into the moulds to about ¾ full and chill in the fridge for about 2 hours. Preheat the oven to 180°C and when ready to bake take the moulds out of the fridge, tap each one lightly on the bench-top to release any air bubbles and place on a tray in the middle of the oven. Bake for 10-12 minutes, until a crust has formed on the tops and the sides are just starting to come away from the moulds. The centres should still be a little wobbly.

Turn out onto serving plates using a palate knife if necessary. Dust with cocoa powder and serve with a quenelle of crème fraiche and fresh blueberries and raspberries.

Notes:

I highly recommend you use the same chocolate I have in this recipe, not only because it really is delicious, but because chocolate differs vastly depending on the content of syrup-producing sugar and drying cocoa particles [12].

My pairing was inspired by the fondant tart  and wine list at Bacchus restaurant in Brisbane. This is also where I had one of my three outstanding synergistic food and wine pairings, not surprising given the head sommelier, Andrew Giblin, has won multiple awards for his wine list which at 56 pages long is one of the most extensive I have ever seen. I have included the links to their menu and wine list in the reference section below [13] [14].

References

[1] Cases, Y 2016, Wine and Chocolate Pairing – Is it Possible?, The Wine Gallery, viewed 20 May 2017, < http://blog.thewinegallery.com.au/wine-and-chocolate-pairings/&gt;.

[2] Sonoma County (n.d.), The History of Zinfandel, viewed 20 May 2017, < http://www.sonomacounty.com/articles/history-zinfandel&gt;.

[3] Wilson, T 2007, ‘Sip and Savour: The Science and Art Behind the Perfect Wine and Chocolate Pairing’, Canada NewsWire, 12 May, p. 1.

[4] Dornenburg, A 2006, ‘Food and Beverage Pairing 101’, in Dornenburg, A & Karen, P (eds.), What to drink with what you eat; the definitive guide to pairing food with wine, beer, spirits, coffee, tea – even water – based on expert advice from America’s best Sommeliers, Bulfinch Press.

[5] Harrington, R 2005, ‘The Wine and Food Pairing Process: Using Culinary and Sensory Perspectives’, Journal of Culinary Science & Technology, vol. 4, no. 1, pp. 101-112.

[6] Platter, J 2015, My Kind of Wine, PawPaw Publishing, South Africa.

[7] Little, M 2017, Contemporary aspects of food and wine systems Topic 5, Blackboard Notes, Southern Cross University, viewed 13 March 2017, <HOS03421 Blackboard site>.

[8] Stone, H & Sidel, J 2004, Sensory evaluation practices, Elsevier Academic Press, London.

[9] Shepherd, GM 2011, Neurogastronomy, Columbia University Press, New York.

[10] Herdenstam, APF, Hammaren, M, Ahlstrom, R & Wiktorsson, P 2009, ‘The Professional Language of Wine: Perception, Training and Dialogue’, Journal of Wine Research, vol. 20, no. 1, pp. 53-84.

[11] Koone, R, Harrington, R, Gozzi, M & McCarthy, M 2014, ‘The role of acidity, sweetness, tannin and consumer knowledge on wine and food match perceptions’, Journal of Wine Research, vol. 25, no. 3, pp. 158-174.

[12] McGee, H 2004, On Food & Cooking: an encyclopedia of kitchen science, history and culture, Hodder & Stoughton, Great Britain.

[13] https://www.bacchussouthbank.com.au/a-la-carte

[14] https://www.bacchussouthbank.com.au/files/7rsqsubiyb.pdf


Eggs Benedict

Eggs 2 Benedict

As part of my Master of Gastronomic Tourism food technology unit, I have been asked to make eggs benedict. Easy, right? Except I have to make everything – the sourdough (culture and bread), the butter, hollandaise and the poached eggs. None of which I have made before. On the upside, I don’t have to go salmon fishing or pig farming.

Actually, I’m really excited about this, and so are my friends. They know how much I love to cook and have all jolly decently offered to help me test my efforts. I’m looking forward to learning some the technology behind these foods – the chemical, physical and functional basis of the ingredients. So I’m going to take you on the journey with me, as I cook with and learn about carbohydrates, proteins and lipids and some of the processes that turn them into delightfully delicious foods.

Appropriately, we’ll start with the starter. Sourdough is my favourite type of bread, but I also know it’s incredibly hard to make, so the first thing I do is read the recipe – three times. Then I consult the experts, looking for advice on what and what not to do. A lot of it is pretty scientific and it soon becomes clear that this is a highly temperamental bread, so with a healthy dose of trepidation and a tub of yoghurt I get started.

Sourdough

Day 1

I mix 75 ml full fat plain yoghurt with 175 ml warmed skimmed milk. Looks pretty boring to me, but my research assures me that pretty soon the bacteria in the yoghurt will set to work digesting the lactose sugar in the milk, converting it into lactic acid which will sour and thicken it. In other words, the process of fermentation will begin [1].

Day 2

I add 120 grams of strong (bread) flour. This flour is high in protein, which is good for the development of gluten and a well-risen loaf [2]. I cover the starter loosely and leave it at room temperature for two days.

Day 4

My starter is bubbling nicely and smells a bit sour. Lovely. This tells me the bacteria, in consuming the sugars for energy, is producing alcohol and carbon dioxide – the gas bubbles we need to help leaven the dough [3].  I add 180 grams more of the same flour, as well as 100 ml warmed water and 40 ml milk.

Day 5

By now the wheat starch is likely being degraded to monosaccharides and disaccharides, with proteolysis (amino acid production) adding to the formation of my bread’s flavour [4].  I discard half of the starter and add another 150 grams of flour and 150 ml of warm water and mix thoroughly.

Day 6

Baking day. I warm 225 ml water to 49°C, remove 4 tablespoons to a glass and sprinkle over 15 grams of dry yeast. After about 5 minutes it begins to foam. Meanwhile, in a separate bowl I mix the balance of the water with 250 grams of the sourdough starter and add a cup of flour. I stir until it is combined, then add the foamy yeast and mix for another 5 minutes. As the dough starts to come together I imagine the substances produced by the yeast and the oxygen are working together to form long glutenin chains and an interconnected network of coiled proteins, or what we call gluten [2]. My research also tells me that the production of metabolites by the yeast I have added is going to add more aroma compounds that the sourdough would have had if I had used just the starter [5].

Bread 5 Dough Wet

I add the balance of 450 grams of flour and one tablespoon of salt and knead the dough for a solid 10 minutes. Doing this helps stretch and organise the glutenin proteins into an elastic network, while at the same time working the gliadin proteins to develop the dough’s plasticity [2]. The addition of salt will help to tighten the protein bonds and develop better dough elasticity and strength [3].

The dough is left in a greased bowl covered with a damp cloth, in a room I have heated to 30 degrees Celsius for about an hour or until doubled. Doing so encourages the process called autolysis (the Greek term for “self-digestion”), which basically means the dough is doing a lot of the hard work, forming a solid gluten structure and creating a stretchy dough with large air pockets retaining the aromatic gases produced during fermentation [3].

Bread 8 Dough after 1st leavening

I punch down the dough and shape it into a round loaf, place it on a baking tray dusted with cornflour, cover it with a damp cloth and return it my 30-degree heated room.

It rises fairly quickly to double its initial size again. I brush the top of the dough with beaten egg white and score a basic square, trying to keep it at an angle to form a protective lip which should allow the cut to retain moisture and crack smoothly.

Bread 9 Dough after 2nd leavening

The dough goes onto the middle rack of the oven at 230°C, over a pan of boiled water, for 10 minutes. The water will create steam in the oven, keeping the crust soft and allowing the bread to maximise its rise from the rapidly expanding gases (a process called “ovenspring”) [6].

I remove the water and reduce the temperature to 190°C, baking the bread for about 40 minutes until it is well browned. So what happens while I’m holding my breath and willing my bread to rise perfectly? The gluten’s protein molecules start bonding together, squeezing out water and forming a network around the starch granules and water bubbles [7]. Simultaneously, the starch granules start separating from each other and thickening as they absorb the water discharged by the gluten [7]. In other words, the starch gelatinises, forming a moist crumb [8].  Meanwhile the dry heat in the oven is breaking down the starches on the outside of the bread and turning them into disaccharides (dextrins), which are brown and have a very distinctive taste [9].

At last it’s time to remove my loaf from the oven and bask in the heady aroma of freshly baked bread. My sanctimonious glee is only slightly marred by the fact that my bread is not quite as leavened as I would have liked. In fact, when I’ve allowed it to cool a little and slice it, I realise it’s quite dense. Only marginally deterred (it is my first effort after all), I butter a crusty slice and enjoy its pleasantly sour chewiness while I contemplate where I went wrong.

Perhaps I should have leavened the dough at a lower temperature, given that temperatures of 30-35 degrees Celsius promote the development of bacteria, while temperatures of 20-25 degree Celsius are more conducive to yeast growth in acid environments [2].

Maybe I should have scored the top more, which would have given the dough more weak points, allowing the surface to burst and the bread to expand [3]. Maybe I over-fermented the dough, allowing the breakdown of the gluten bonds [3], or maybe I didn’t aerate the starter enough, limiting the oxygen the yeast needs to grow [2].

I decide to accept it as a learning experience, promising myself I’ll try it again, perhaps with a rye wholegrain starter, a combination of flours and a little more time.

Butter

Knowing that butter is often simply the result of over-whipping cream, I am far less apprehensive about making it. Using 39.4% fat pure cream, I use an electric beater to agitate it until the fat globules become so damaged that their fat starts leaking out [2]. I continue churning until the buttermilk starts forming a mass separate from the fat grains. This takes a little over 10 minutes. I place the grains in a piece of muslin suspended over a bowl and squeeze out the excess buttermilk, then push the butter into containers and drain off the buttermilk that rises to the surface. Done.

Hollandaise Sauce

Julia Childs says of hollandaise that whichever way you make it, the desired result is the same, “that of forcing egg yolks to absorb butter and hold it in a creamy suspension” [10]. All the recipes I have found incorporate egg yolks, water and butter and call for the addition of vinegar or lemon. The other primary ingredients include a low and gradual heat, constant attention and patience.

My recipe starts with boiling 1 tablespoon of vinegar with ¼ teaspoon of crushed peppercorns, until only a third of the liquid remains. I add a tablespoon of cold water to this and allow it to cool.

Next I add 2 egg yolks and 2 teaspoons of cold water and whisk the ingredients together. I put the pan over another pan of gently simmering water and continue whisking until the yolks foam and thicken to the point that the trail of the whisk leaves a mark and I begin to see the bottom of the pan. To achieve this “sabayon” stage the egg yolks have to undergo denaturation, a process essential to forming the gel that will retain the foam and air bubbles [11]. I mentioned low and gradual heat before. This is critical as overheating the sauce could denature the proteins too much and result in a curdled or runny sauce [12]. Once I have achieved my gel, I remove it from the heat and allow it to cool slightly.

The next stage of the sauce is the emulsification (although the yolks have already been somewhat emulsified with the water). Egg yolks are rich in phospholipids which act as emulsifying agents and will keep the water and oil separated in the sauce [11]. To ensure the butter I add is not below the temperature at which butter crystalises (38°C) and to make sure its molecules are small enough to be emulsified, I melt my butter before adding it very gradually while whisking [11]. Once all the butter has been incorporated and my sauce is silky smooth, I add cayenne pepper and salt to taste and keep the sauce warm over a pan of lukewarm water, while I set to making my poached eggs and grilling my sourdough.

Hollandaise 3 Sauce

Poached Eggs

Strange to think I’ve come this far and this is one of the elements of this dish that intimidates me the most. Perhaps it’s because I know how critical it is to have fresh eggs and I have no idea how long the eggs I’ve bought have been in transit or sitting on the shelf at the store. A little research tells me that I can test this by plunging the eggs into salted water (125 grams salt per litre of water). If they sink, the egg is less than 3 days old; if it floats about midway in the pan, its likely 3 to 6 days old, but if it floats on the surface, it’s too old to use [13].

Another reason for my trepidation is the knowledge that the egg white – the albumen – has a thin outer layer that has a tendency to spread out before it solidifies [2]. I’ve tried the vortex method before and like Felicity Cloake, can attest that while I may understand the logic of this, my eggs do not [14].

Well prepared to use all the help I can get, I add a dash of vinegar to a deep saucepan of boiled water. The vinegar helps coagulate the egg proteins quicker, but has the added benefit of preventing the proteins from getting too close and so makes the texture of the cooked egg more tender [2]. My next trick is to crack the eggs into two small but open-lipped bowls, stir the water to create the afore-mentioned vortex and drop the in while uttering sweet nothings. I’ve reduced the temperature of the water to a gentle simmer, hoping that this will save my eggs from too much turbulence and after 3 minutes, I cradle them out of the pan with a slotted spoon. They’re perfect – albeit for a few tatty strands which I gently snip away before plating.

IMG_6538 (2)

Eggs benedict is my favourite dawn breaker, and always will be, but I’ll never take a perfectly served rendition of it for granted again.

References

[1] BBC, 2014, Using bacteria to make cheese and yoghurt, viewed 20 May 2017, <http://www.bbc.co.uk/bitesize/standard/biology/biotechnology/living_factories/revision/6/&gt;.

[2] McGee, H 2004, On Food & Cooking: an encyclopedia of kitchen science, history and culture, Hodder & Stoughton, Great Britain.

[3] Lugg, CA & Fjeld, MIH 2017, Sourdough, Hardie Grant Books, London.

[4] Kati, K, Kaisa, P & Karin, A 2004, ‘Influence and Interactions of Processing Conditions and Starter Culture on Formation of Acids, Volatile Compounds, and Amino Acids in Wheat Sourdoughs’, Cereal Chemistry, vol. 81, no. 5, pp. 598-610.

[5] Corsetti, A & Settanni, L 2006, ‘Lactobaccilli in sourdough fermentation’, Food Research International, vol. 40, no. 5, pp. 539-558.

[6] Christensen, E 2009, Food Science Tip: Add Steam When Baking Bread, Kitchn, viewed 20 May 2017, <http://www.thekitchn.com/food-science-tip-add-steam-whe-76586&gt;.

[7] Ulin, D 2010, What happens to bread in the oven? Indiana Public Media, viewed 20 May 2017, <http://indianapublicmedia.org/amomentofscience/bread-oven/&gt;.

[8] Peter Reinhart: The art of baking bread, TED Talks, viewed 10 May 2017, < https://www.youtube.com/watch?v=gK8Yk3mEEb8&gt;.

[9] Love Food Love Science (n.d.), Carbohydrates: Dextrinization, viewed 20 May 2017, < http://www.ifst.org/lovefoodlovescience/resources/carbohydrates-dextrinization&gt;.

[10] Childs, J, Bertholle, L & Beck, S 2013, Mastering the Art of French Cooking, 25th edn, Alfred A Knopf, New York.

[11] Hopia, A, Sillanpaa & M, Tuomisto, M 2013, ‘Hollandaise sauce and the chemistry behind old and new preparation techniques’, Lumat, vol. 1, no. 2, pp. 189-196.

[12] Fulton, M 2009, Margaret Fulton’s Encyclopedia of food and cookery, 3rd edn, Grant Hardie Books, Australia.

[13] Larousse Gastronomique 2009, Hamlyn, London.

[14] Cloake, F 2010, How to make the perfect poached egg, The Guardian Word of Mouth Blog, viewed 2 May 2017, <https://www.theguardian.com/lifeandstyle/wordofmouth/2010/sep/16/how-make-perfect-poached-egg&gt;.